Hello, Varun from Clay here 👋🏽 I joined Clay in May as our Head of Operations and love that my full-time job is to play with Clay. But formulas — a huge part of Clay — still seemed out of reach for me. I was intimidated by formulas because I didn’t know how to code, but at a certain point, it became clear I needed to overcome my fear and just learn this.
And in less than a half hour, my teammate Matt (who is also not an engineer) taught me everything I needed to know on how to use Javascript for Clay formulas. So if Matt and I can learn these that quickly, so can you! This post will teach you what you need to know to get started with formulas in Clay and unlock loads of functionality that can superpower your business.
Here’s what we will cover:
- How to write conditional statements 🧞♀️
- How to combine two sets of data together 🤽🏽♂️
- How to auto-qualify leads or candidates 🏆
And as a reminder, you can always check out our guide on formulas to learn the basics of using formulas in Clay.
Conditional Statements 🧞♀️
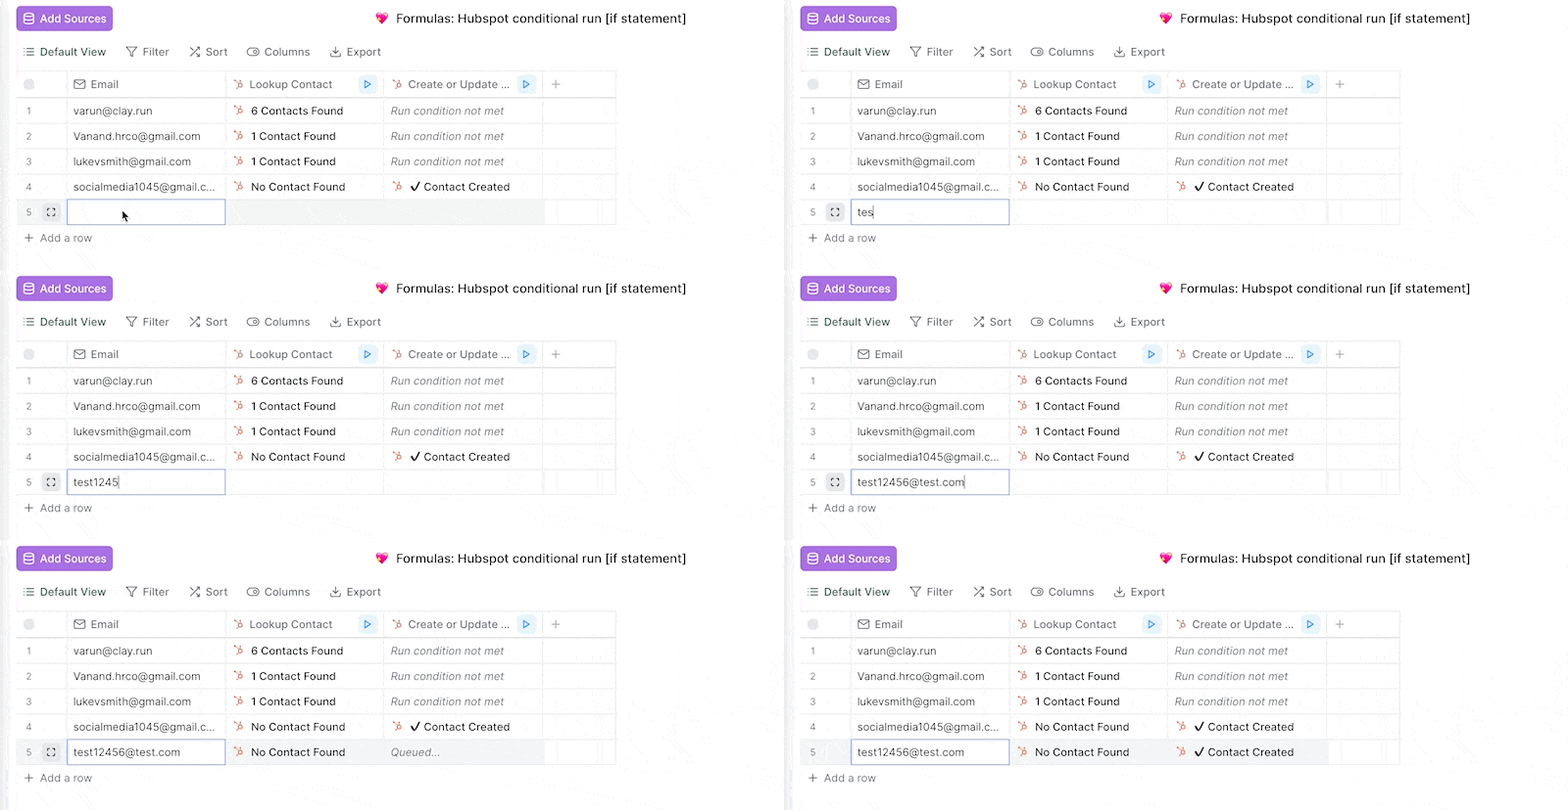
Conditional statements are statements that can be written in an “if X, then Y” format. Practically, conditionals lets you choose what data gets sent where depending on certain qualifiers (e.g. title, location, etc.). In this example below, we’ll start with a sample set of emails, lookup to see if these records exist in Hubspot, and if they do not, we’ll create them. I’ve also added a screenshot below of both of the integrations side-by-side so you can see the inputs clearly.
By the way, the engineers on my team (I’m looking at you, Anita) tell me that computer science textbooks teach concepts by showing the complex way first so that people understand the concept, and then give readers a simple solution at the end. So we’re going to do the same thing with this example to stay true to our roots.
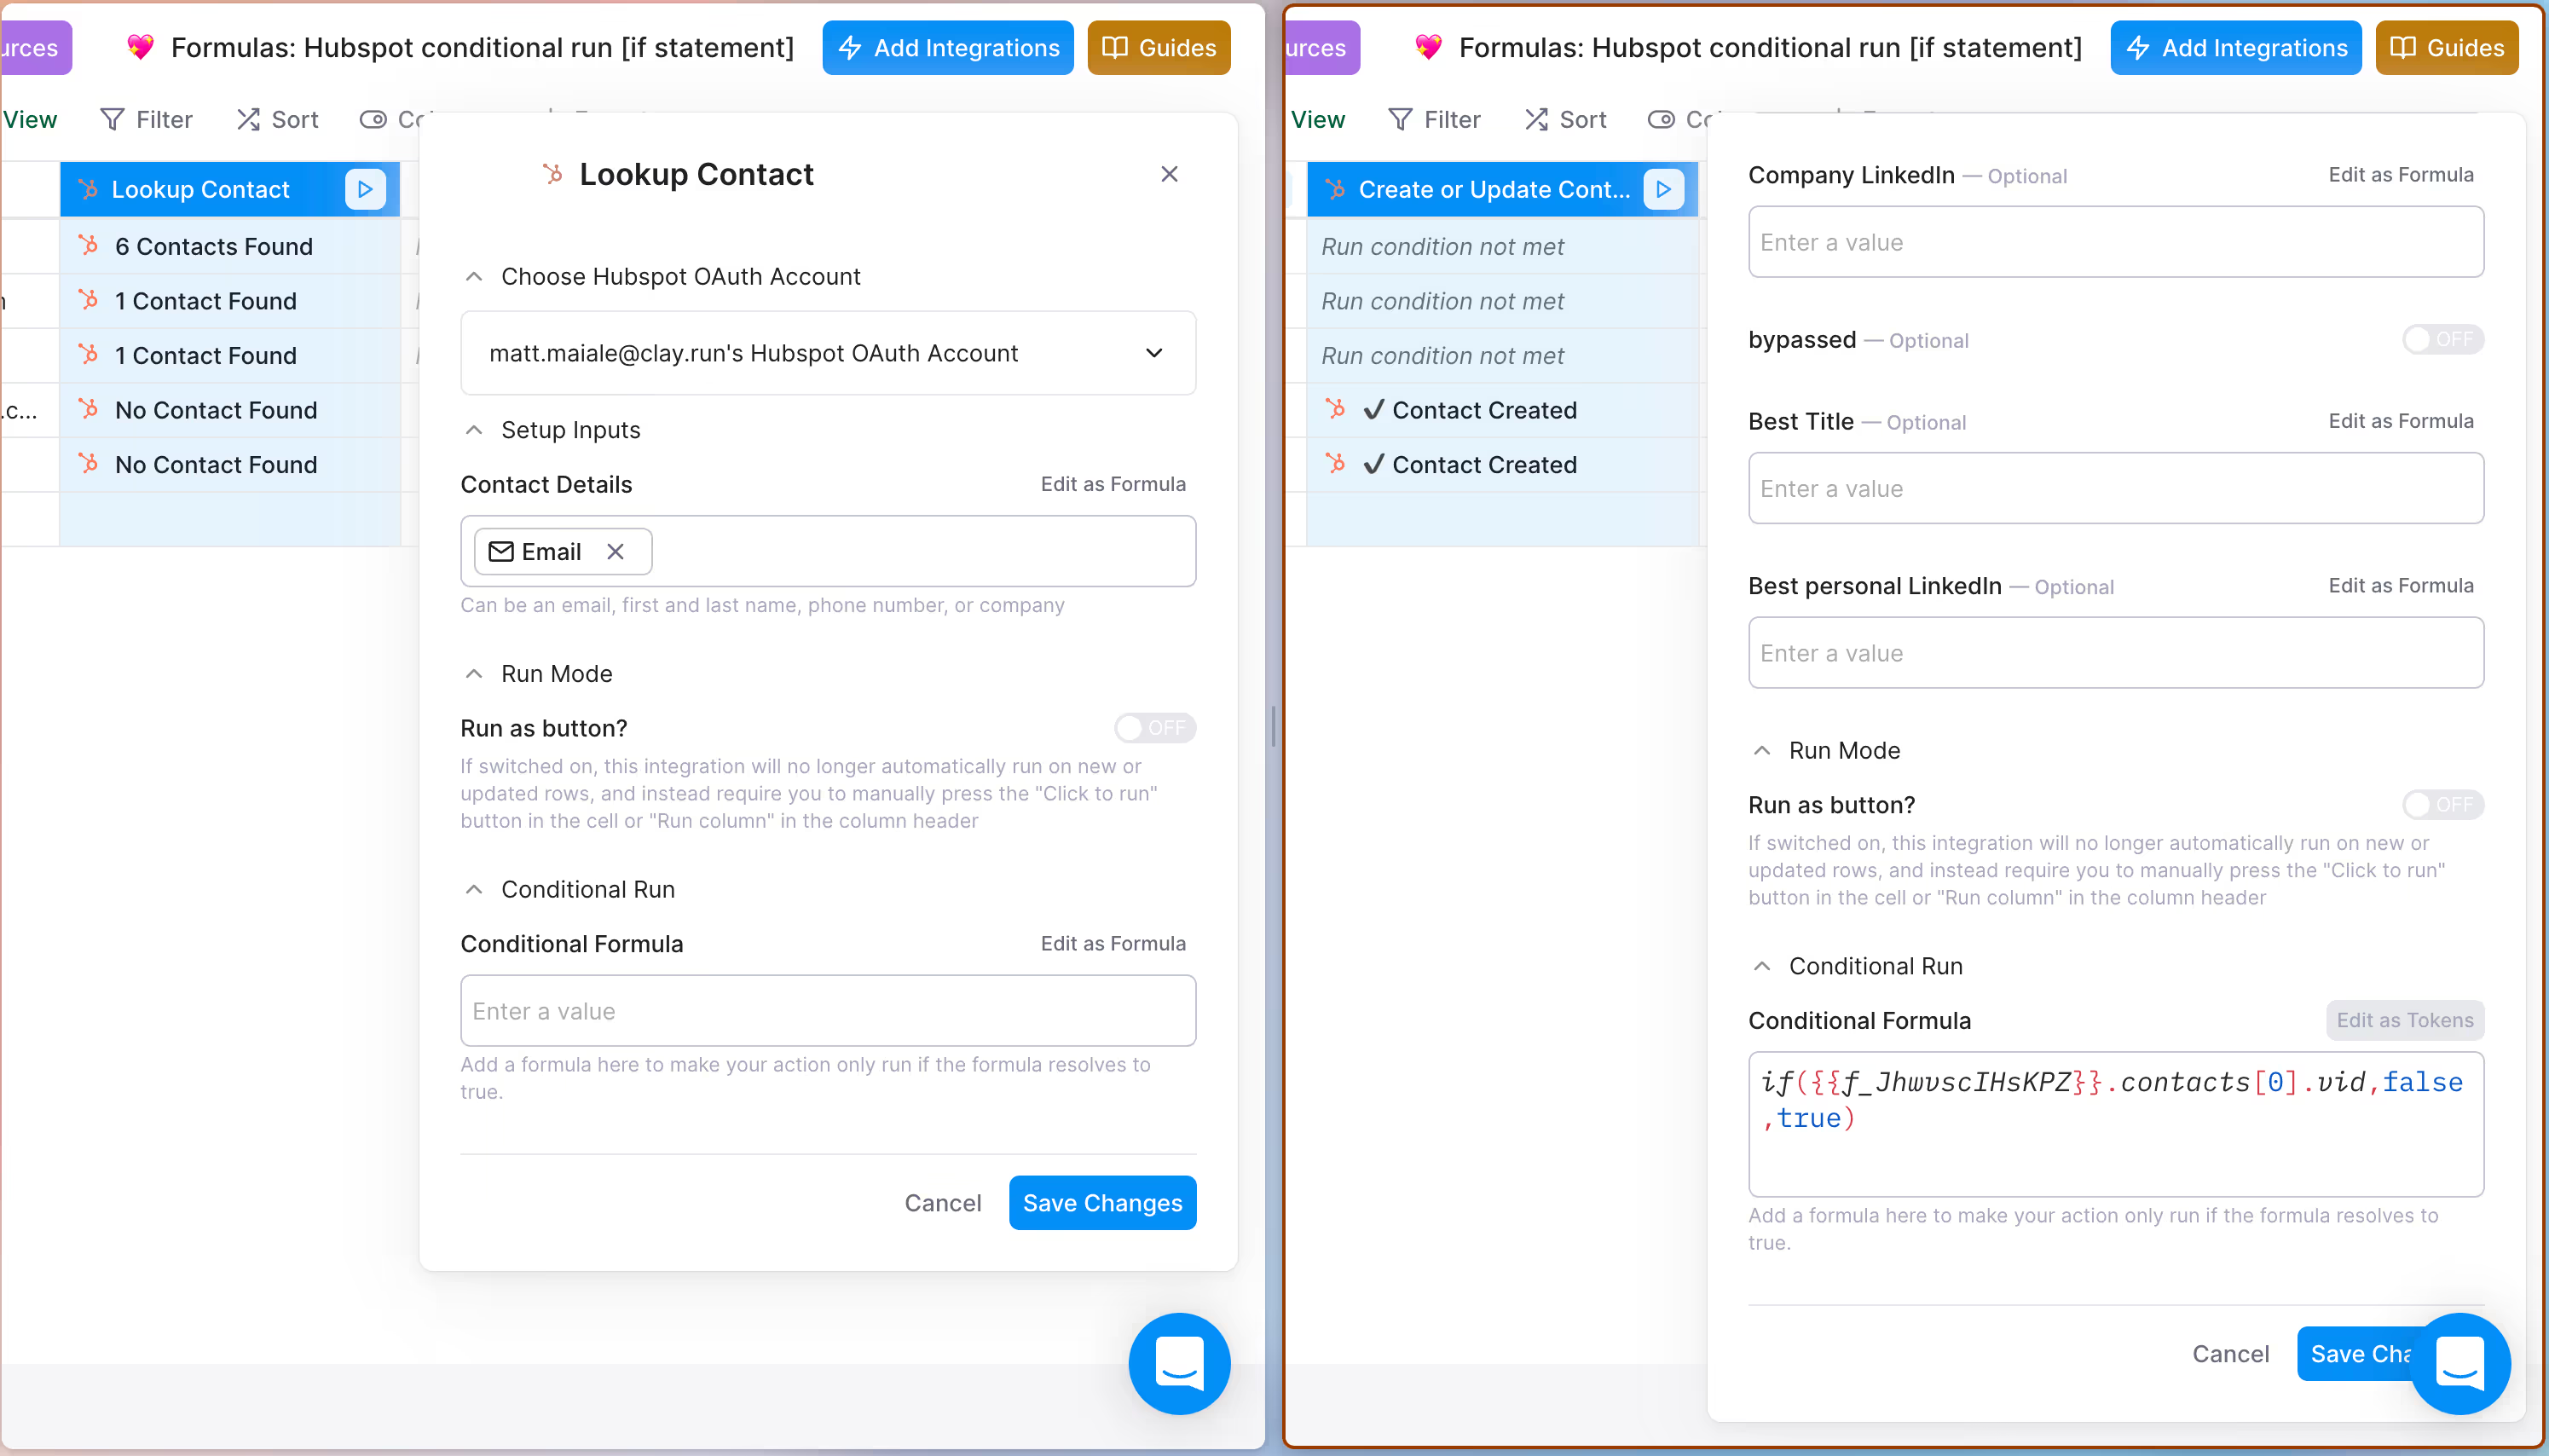
The emails and lookup contact integrations are straightforward. For “create or update contact,” we added the below if statement in the “conditional formula” box at the bottom of the integration. Let’s break this down to understand what it means.
if({{f_JhwvscIHsKPZ}}.contacts[0].vid,false,true)
- Every if statement begins with “if(” - remember to close the parentheses at the end!
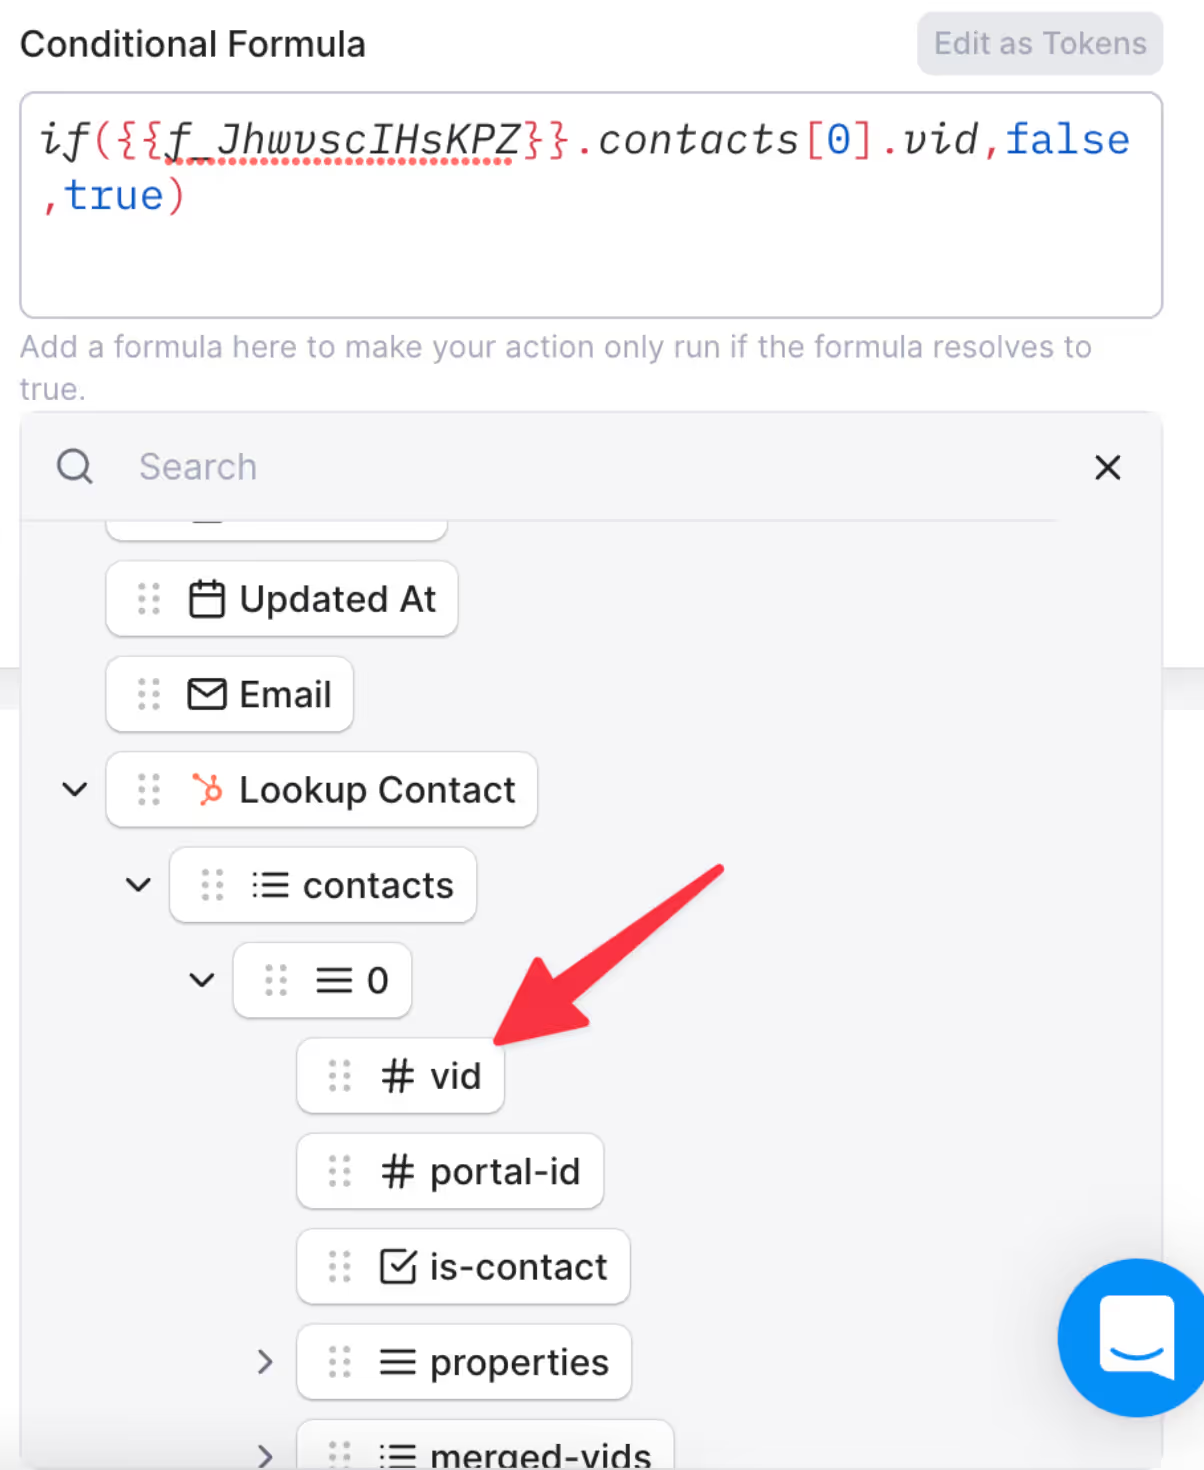
- Now “{{f_JhwvscIHsKPZ}}.contacts[0].vid” looks fancy and confusing, but it’s just one of the data points in Javascript format. I chose the below data point (# vid) because I knew it wouldn’t exist if the contact wasn’t found in Hubspot.
- “false, true” is just the sequence of actions you’re asking the formula to take. So in this example, we’re saying that if that “# vid” token exists, then do not run the “create record” action (hence, “false”). But if “# vid” doesn’t exist, then run the “create record” action (hence “true”). So that is why “false” comes before “true” in this sequence.
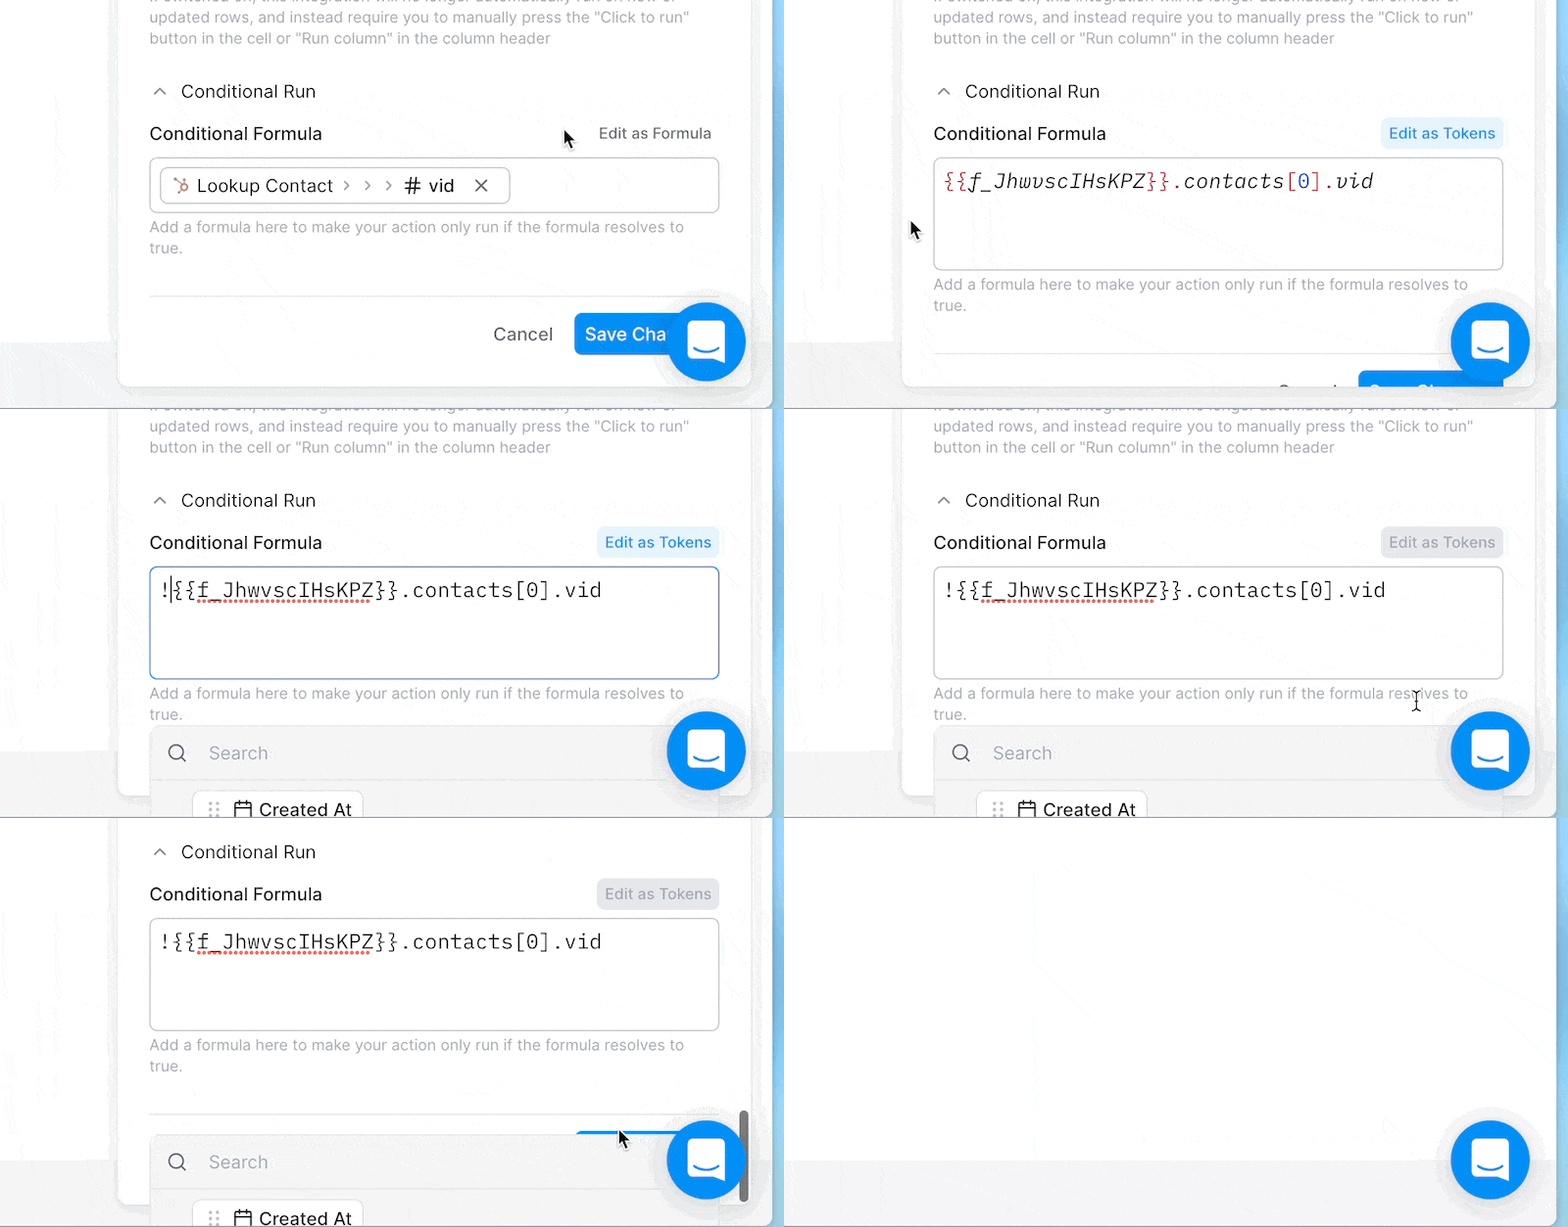
OK, now that you’ve understood the complex way to do this that is more broadly applicable, here’s the simpler approach for this particular use case. Ready for this? All you have to do is put the appropriate field in the conditional run box, and add an “!” before it to indicate that you’re looking for the absence of it.
How to combine two columns of data together 🤽🏽♂️
Okay, great. Now that we understand conditional runs, let’s take a stab at combining two sets of data together. Let’s say you got some domains from Clearbit and other URLs from Google, but wanted them in one column, and wanted the highest quality provider first. In this case, you noticed that Google was the better provider, so you wanted Google’s data to go first, and then use Clearbit data when Google didn’t find a domain. So in the example below, we are combining data sets from two different columns into the final column, where the first column is prioritized.
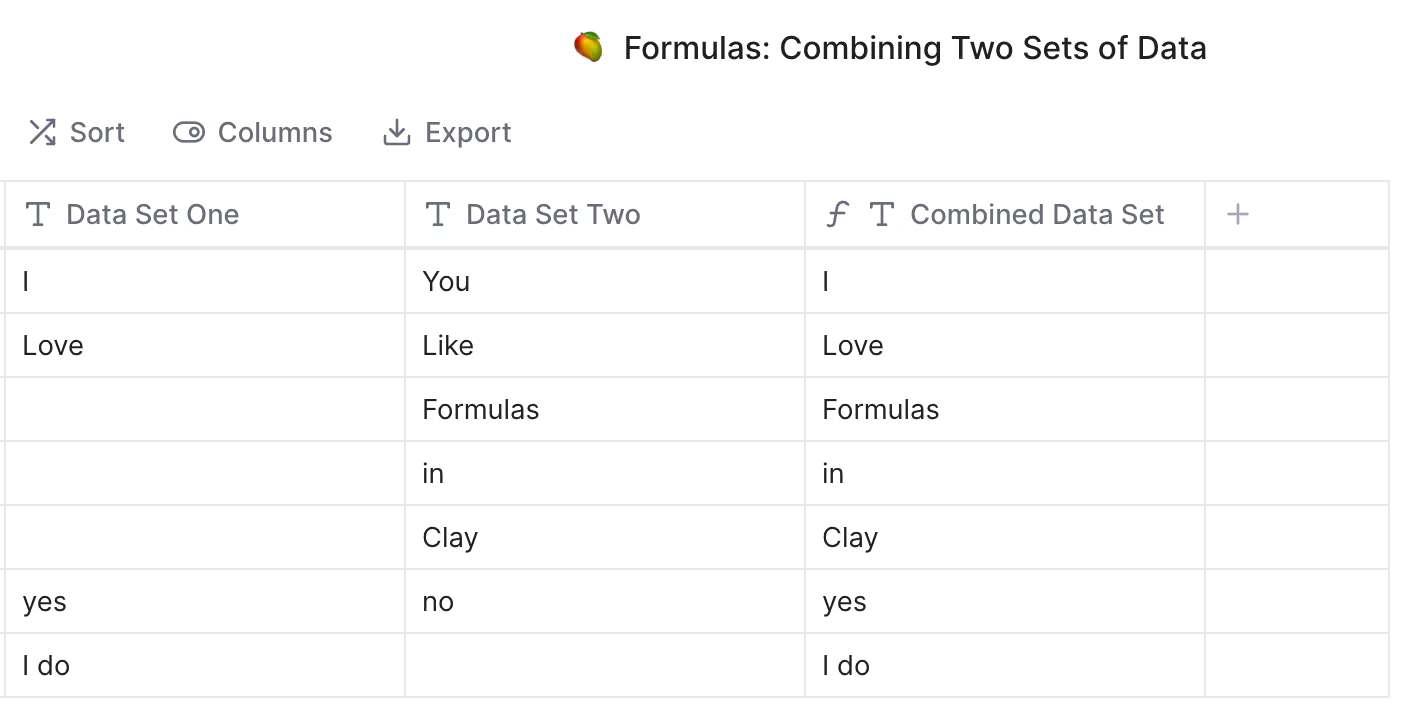
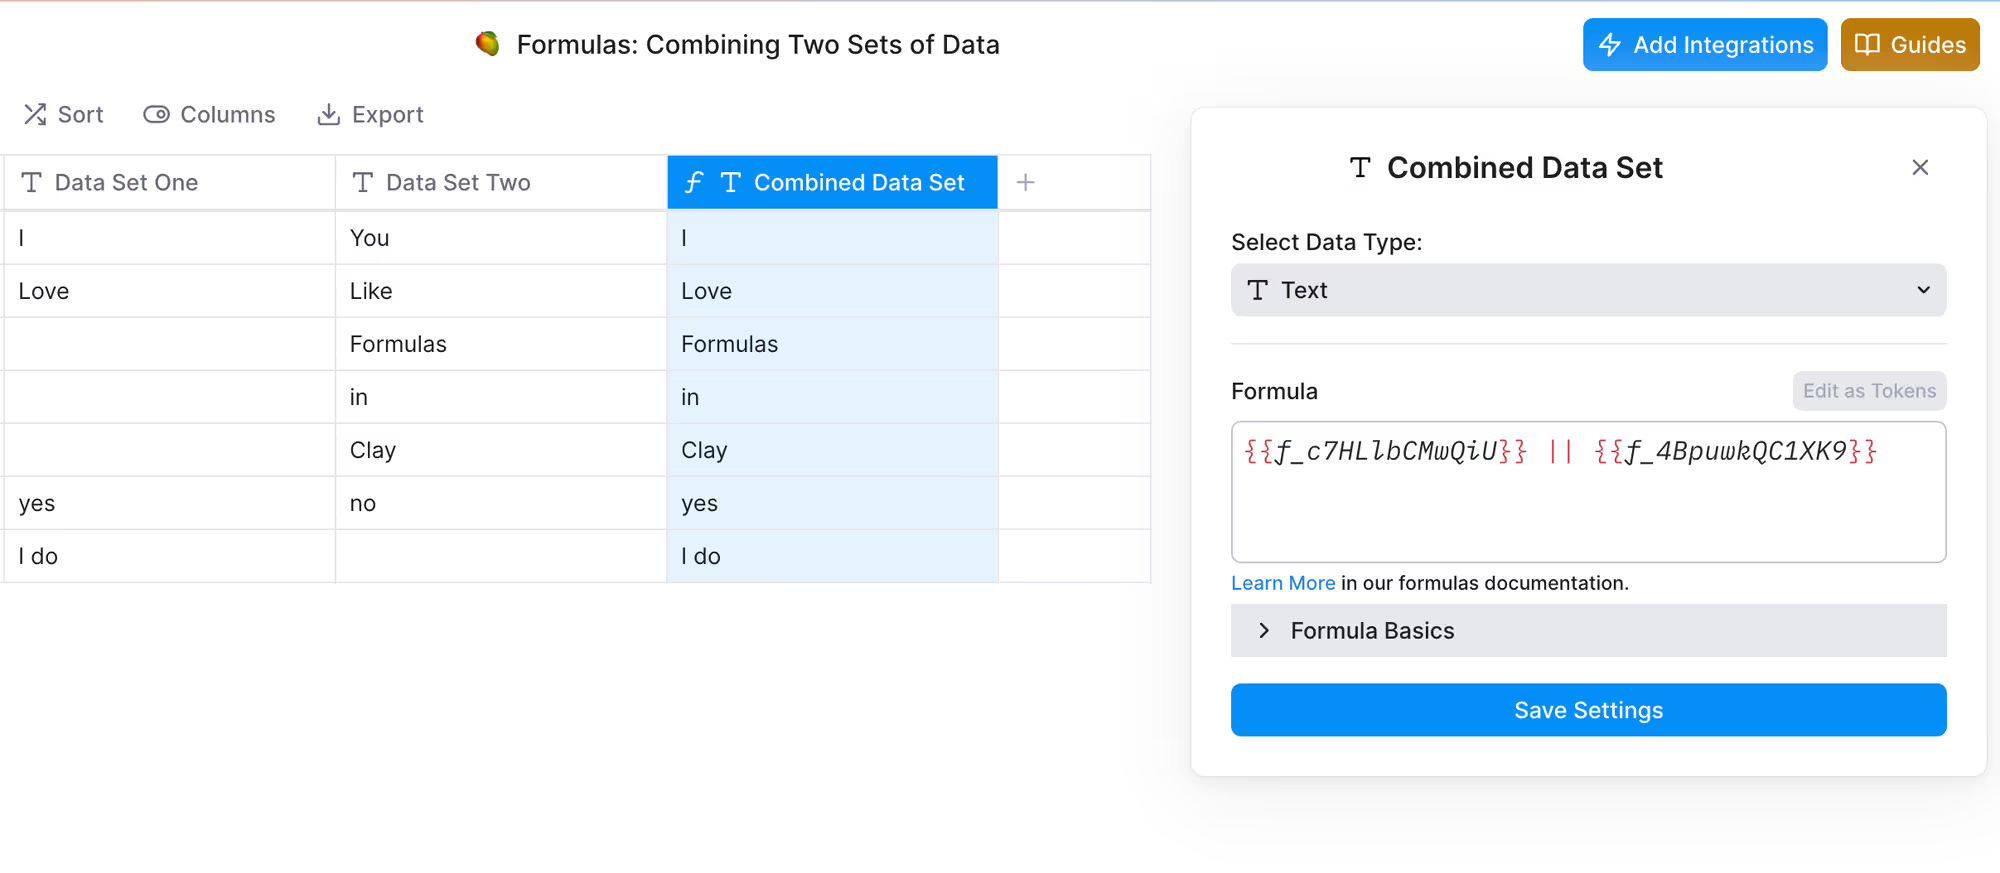
To do this, all you need is a simple formula using the logical operator “||” which means “or”. In the screenshot below, the formula is saying “’data set one’ OR ‘data set two’” with the first column being prioritized. You can add more columns to this by adding “II” after the second column.
Qualifying leads or candidates! 🏆
We’re making real progress! Now on to qualification. After reading this section, you should be able to mark leads as qualified or not in checkboxes (or via text) depending on certain criteria in your Clay table. In this example, leads are qualified if the company has more than 100 employees or the job title includes “operations.” They are not qualified if the company has more than 100 employees and the job title includes “operations.”

The formulas are as follows:
>100 OR "operations" = if({{f_cwutY2W8ChOX}}>100 || {{f_wd2omEPaVBAc}}.includes("Operations"),"true","false")
>100 AND "operations" = if({{f_cwutY2W8ChOX}}>100 && {{f_wd2omEPaVBAc}}.includes("Operations"),"true","false")
Again these follow the “if” statement logic described above. The new elements to note here are:
- “| |” = “or” and “&&” = “and”
- “.includes(”text”)” is how you indicate you’re searching for a particular keyword
- “true” and “false” here is what triggers the checkbox being checked or not
- Note: if you wanted to trigger text instead of checkboxes, change the data field to text and replace “true” and “false” with the text you want to appear.
Let us know if you have any questions, and stay tuned for more posts on how to use formulas in Clay soon!
Hello, Varun from Clay here 👋🏽 I joined Clay in May as our Head of Operations and love that my full-time job is to play with Clay. But formulas — a huge part of Clay — still seemed out of reach for me. I was intimidated by formulas because I didn’t know how to code, but at a certain point, it became clear I needed to overcome my fear and just learn this.
And in less than a half hour, my teammate Matt (who is also not an engineer) taught me everything I needed to know on how to use Javascript for Clay formulas. So if Matt and I can learn these that quickly, so can you! This post will teach you what you need to know to get started with formulas in Clay and unlock loads of functionality that can superpower your business.
Here’s what we will cover:
- How to write conditional statements 🧞♀️
- How to combine two sets of data together 🤽🏽♂️
- How to auto-qualify leads or candidates 🏆
And as a reminder, you can always check out our guide on formulas to learn the basics of using formulas in Clay.
Conditional Statements 🧞♀️
Conditional statements are statements that can be written in an “if X, then Y” format. Practically, conditionals lets you choose what data gets sent where depending on certain qualifiers (e.g. title, location, etc.). In this example below, we’ll start with a sample set of emails, lookup to see if these records exist in Hubspot, and if they do not, we’ll create them. I’ve also added a screenshot below of both of the integrations side-by-side so you can see the inputs clearly.
By the way, the engineers on my team (I’m looking at you, Anita) tell me that computer science textbooks teach concepts by showing the complex way first so that people understand the concept, and then give readers a simple solution at the end. So we’re going to do the same thing with this example to stay true to our roots.


The emails and lookup contact integrations are straightforward. For “create or update contact,” we added the below if statement in the “conditional formula” box at the bottom of the integration. Let’s break this down to understand what it means.
if({{f_JhwvscIHsKPZ}}.contacts[0].vid,false,true)
- Every if statement begins with “if(” - remember to close the parentheses at the end!
- Now “{{f_JhwvscIHsKPZ}}.contacts[0].vid” looks fancy and confusing, but it’s just one of the data points in Javascript format. I chose the below data point (# vid) because I knew it wouldn’t exist if the contact wasn’t found in Hubspot.

- “false, true” is just the sequence of actions you’re asking the formula to take. So in this example, we’re saying that if that “# vid” token exists, then do not run the “create record” action (hence, “false”). But if “# vid” doesn’t exist, then run the “create record” action (hence “true”). So that is why “false” comes before “true” in this sequence.
OK, now that you’ve understood the complex way to do this that is more broadly applicable, here’s the simpler approach for this particular use case. Ready for this? All you have to do is put the appropriate field in the conditional run box, and add an “!” before it to indicate that you’re looking for the absence of it.

How to combine two columns of data together 🤽🏽♂️
Okay, great. Now that we understand conditional runs, let’s take a stab at combining two sets of data together. Let’s say you got some domains from Clearbit and other URLs from Google, but wanted them in one column, and wanted the highest quality provider first. In this case, you noticed that Google was the better provider, so you wanted Google’s data to go first, and then use Clearbit data when Google didn’t find a domain. So in the example below, we are combining data sets from two different columns into the final column, where the first column is prioritized.

To do this, all you need is a simple formula using the logical operator “||” which means “or”. In the screenshot below, the formula is saying “’data set one’ OR ‘data set two’” with the first column being prioritized. You can add more columns to this by adding “II” after the second column.

Qualifying leads or candidates! 🏆
We’re making real progress! Now on to qualification. After reading this section, you should be able to mark leads as qualified or not in checkboxes (or via text) depending on certain criteria in your Clay table. In this example, leads are qualified if the company has more than 100 employees or the job title includes “operations.” They are not qualified if the company has more than 100 employees and the job title includes “operations.”

The formulas are as follows:
>100 OR "operations" = if({{f_cwutY2W8ChOX}}>100 || {{f_wd2omEPaVBAc}}.includes("Operations"),"true","false")
>100 AND "operations" = if({{f_cwutY2W8ChOX}}>100 && {{f_wd2omEPaVBAc}}.includes("Operations"),"true","false")
Again these follow the “if” statement logic described above. The new elements to note here are:
- “| |” = “or” and “&&” = “and”
- “.includes(”text”)” is how you indicate you’re searching for a particular keyword
- “true” and “false” here is what triggers the checkbox being checked or not
- Note: if you wanted to trigger text instead of checkboxes, change the data field to text and replace “true” and “false” with the text you want to appear.
Let us know if you have any questions, and stay tuned for more posts on how to use formulas in Clay soon!


.png)



.jpg)






.avif)





.avif)


.avif)
.avif)


